
Mac Tip: How to move Time Machine to another hard drive
15/05/01 04:56 PM Filed in: News | Tips & Tricks
Continue using Time Machine on other hard drives
Many Mac users prefer to backup their data with a tool integrated into OSX: Time Machine. What if the respective hard drive slowly but steadily runs out of free space? With this handy manual you are going to transfer your precious data safely to a new drive.The advantage of Time Machine is that not only all actual data is backed up but also different versions of files. This enables you to jump back in time whenever necessary to restore a former state of a document.
This function therefore requires considerably more space than a comparable simple backup of your files without versioning. In case you picked a small or already partly occupied hard disk when you started out, chances are that it fills up unexpectedly fast.
When there is no more space left on the target disk, Time Machine will ask whether you preferably want to delete older versions to make room for new files. To avoid this you would want to opt for a bigger drive instead- but how to transfer the present backup to the new disk?
Manual
1. PreparationsIf you are going to use a brand new disk you will potentially have to format the drive to utilize it together with you Mac. Connect the volume and switch it on if necessary, then follow all the steps requested by OSX. Alternatively you could use the OSX Disk Utility (found at Applications/Utilities). If you want to use an older hard disk for Time Machine, consider deleting or moving all the data in order to use the maximum capacity for the backup. Deletion could also be performed in the Disk Utility. If necessary you can also change the partition map at that point.
2. Confirm access privileges
When the disk is set up according to your liking, switch to the Finder and open a new window with cmd + N. Then select your future Time Machine disk under "Devices" and open the info panel with cmd + I to make sure that the option “ignore ownership on this volume“ under “Sharing & Permissions” is unchecked. Close the info panel afterwards.
3. Switch off Time Machine
If not done yet, connect the Time Machine disk and turn it on if necessary. Afterwards deactivate Time Machine in the System Settings.
4. Move backups to the new disk
Go back to the Finder and open a second window. In one you select the old backup location, in the second the new one. Now drag the Folder “Backups.backupdb” from the topmost level of the old location to the topmost level of the new disk. The transfer process might take a while, depending on the size of the backup file.
5. Connect the new disk
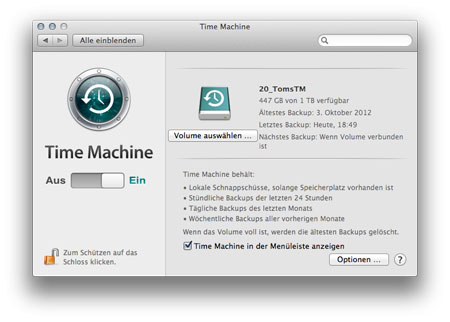
When the copy process is finished, open System Settings/Time Machine again and click “select volume…” and pick your new location. Then confirm by pressing the “use volume“ button in the lower right.
6. Switch on Time Machine
Finally, switch Time Machine back on. The new disk will now be used instead of the old one. The first Backup could take a little longer at the new location but thereon the backup should just work as you are used to.
7. Finished
Now you could delete the old backup on the previous Time Machine hard disk to make room for other content. Keep in mind that the free drive space is only available after emptying the trash.
More information
Apple offers a 3 minute long introduction video for new users, getting you acquainted with the most important functions of Time Machine:
Related articles
How to delete data from iCloud
Speed up starting your MacBook
How to prevent password request in iTunes
*Ads and affiliate links: By ordering products through ads or links marked with an * on this page, we receive a small provision. You are thereby actively contributing to the continuity of GeekOut.io.
Screenshot: Thomas Landgraeber; Video: Apple Inc.
Author & Editor: Thomas Landgraeber; Translation: Mathias Rhein
blog comments powered by Disqus